Building Master Detail Applications for Web Applications with UX Components
- Important Notice for Community Edition Users
- Overview
- Lesson 1: Creating the UX Component and Controls
- Lesson 2: Data Binding the UX Component to the Suppliers and Products Tables
- Lesson 3: Adding Record Navigation and Editing with Action Scripting
- Improving the User Interface
- Publish Your Application
- Appendix A: Validating Data
Description
Learn how to build a Master-Detail application that uses repeating sections. While less powerful that the Grid Component approach, repeating sections can enable you to build robust data entry interfaces for collecting information, such as Orders or customer addresses.
Important Notice for Community Edition Users
This tutorial was built using the full Alpha Anywhere Development Environment. Portions of this tutorial may not apply due to features that are not available in Community Edition. Community Edition users may encounter screens that don't match their environment due to differences between the two development environments.
We strongly recommend starting with the tutorials in the Alpha Software Learning Center to start learning Alpha Anywhere.
Overview
In a UX Component, you can data bind UX controls to one or more tables in a database. This allows you to create interfaces for editing or viewing records in one or more tables. Data bound UX Components have many applications, such as being used as an alternative "detail view" interface for editing a record in a grid component or creating forms, such as an Order form, to collect information to be entered in one or more tables. The UX Component is also the main component used to create mobile applications in Alpha Anywhere.
Repeating sections can be used to display Master-Detail data structures in a UX Component. Repeating sections are a type of container available in UX Components. Controls placed in a repeating section container are duplicated for each row in a repeating section. You can use these controls to edit existing records or create new entries in the table that is tied to the repeating section.
Unlike with Grid components, you cannot create nested repeating sections. You can, however, add multiple repeating sections for tables that are children of the same parent table. For example, a Company can have multiple Employees, Clients, and Vendors. This can be represented in a UX Component with repeating sections. The Employees, Clients, and Vendors could be shown in repeating sections, filtered on the current Company record shown.
Before you Begin
This tutorial requires the following resources before you begin. :
A new or existing workspace
A Connection String for the Northwind Database
The Development Server
You can build these resources yourself or download a pre-configured workspace.
Download the Pre-Configured Workspace
If you're ready to start building, download the pre-configured workspace, which includes a predefined connection string and the Northwind database. This workspace also includes a popup help window that will be displayed when you open the workspace.
Download the workspace. Click here to download the pre-configured workspace
Unzip the workspace inside a folder in the Documents folder in your Users directory. Eg, C:/Users/your_windows_user_name/Documents/GettingStartedWorkspace. The workspace must be placed in a directory that you have read/write access.
Open the workspace. This can be done by double-clicking the GettingStartedWorkspace.adb file.
Creating the Workspace
Follow the tutorials below to create a new workspace and setup the Northwind database. Each tutorial includes detailed, step-by-step instructions that guide you through the process of creating a new workspace, building AlphaDAO connection strings, or setting up the Alpha Anywhere Development Server, which allows you to test web and mobile applications in your development environment.
Create a new Alpha Anywhere Workspace: Learn how to create a new workspace for a mobile or web application by following this step-by-step guide.
Creating AlphaDAO Connection Strings: Learn how to create an AlphaDAO connection string to an Access, MySQL, or SQL Server database using the Northwind database that ships with Alpha Anywhere.
Configuring the Alpha Anywhere Development Server: Learn how to configure the Alpha Anywhere Development Server for testing your web and mobile applications.
Lesson 1: Creating the UX Component and Controls
In this lesson, you will learn:
How to create a UX Component
How to add Multiple Fields to a UX Component at the same time
How to add a Repeating Section to UX Component
Lesson 1-1: Creating a new Component
Create a new UX Component
Create a new UX Component. From the Web Projects Control Panel, click the New button in the toolbar.
Wen the New File dialog appears, select Web Component and click Next.
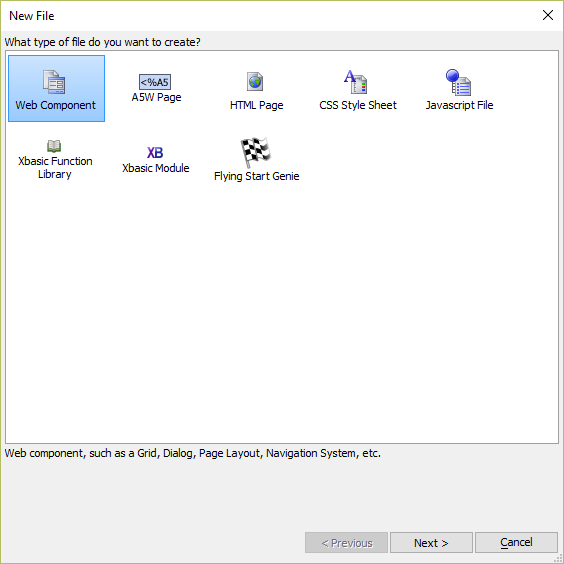 Creating a new Web Component using the New File dialog.
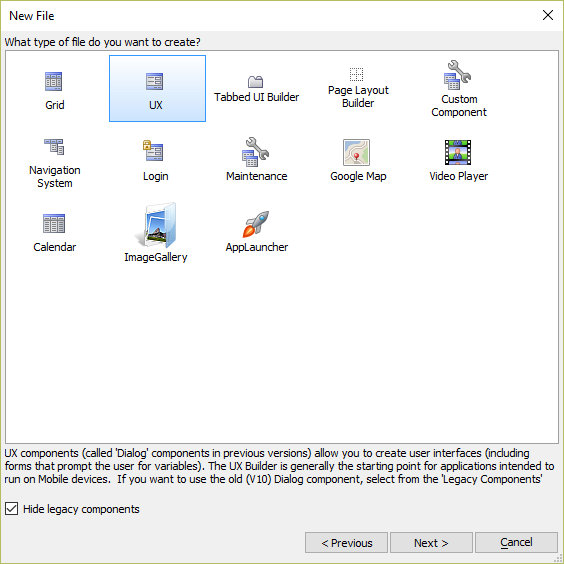
Select UX and click Next.
 Creating a new UX Component from the New File dialog.
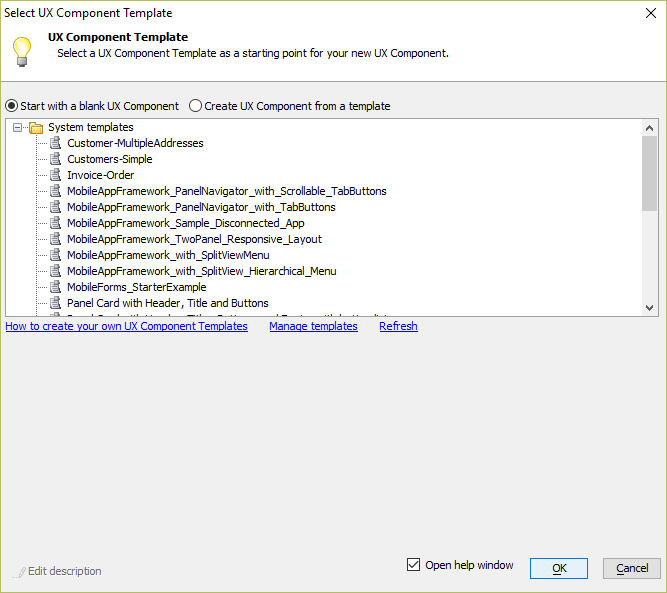
Select Start with a blank UX Component and click OK.
Lesson 1-2: Adding Controls for the Suppliers and Products Table
Next, you need to add controls the UX Component that represent the fields in the Suppliers and Products tables.
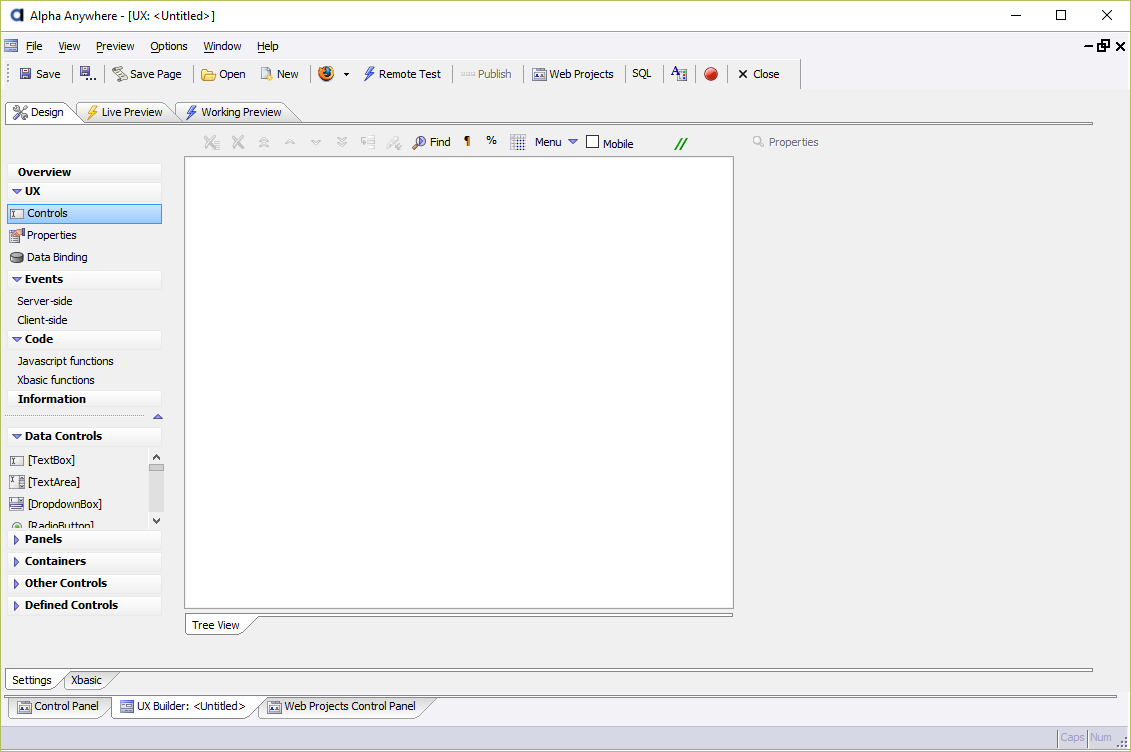
Click on Controls in the left-hand column in the UX section to display the Controls pane.
In the Data Controls section listed on the left-hand column, click
 [TextBox] to open the New Control dialog.
The New Control dialog can be used to insert one control or multiple controls all at once.
Select the Create multiple new controls at once radio button at the top of the dialog. You will use Field type codes to indicate the type of each text box to create. Fields in the Suppliers and Products table are either a Character (C), Numeric (N), or Logical (L) format.
Controls defined in the New Control dialog are be inserted into the UX Component in the order they are defined. You will be placing all of the controls for the Products table in a repeating section below the controls for the Suppliers table. Achieving this layout is easiest if the controls for the Suppliers table are defined first, followed by the controls for the Products table.
First, define the controls to create for fields in the Suppliers table. Specify each control on its own line in the format field_name|field_type:
SupplierID|N
CompanyName|C
Address|C
City|C
Region|C
Country|C
Next, define the controls for fields in the Products table as shown in the example code below. You will add a repeating section around the controls for these fields.
ProductID|N
ProductName|C
QuantityPerUnit|C
UnitPrice|N
UnitsInStock|N
UnitsOnOrder|N
Discontinued|L
When you are done adding the fields, the New Control dialog should look similar to the image below. Click the OK button to create the controls.
 The list of controls and their types that will be added to the UX Component
Select the ProductId, ProductName, QuantityPerUnit, UnitPrice, UnitsInStock, UnitsOnOrder, and Discontinued controls.
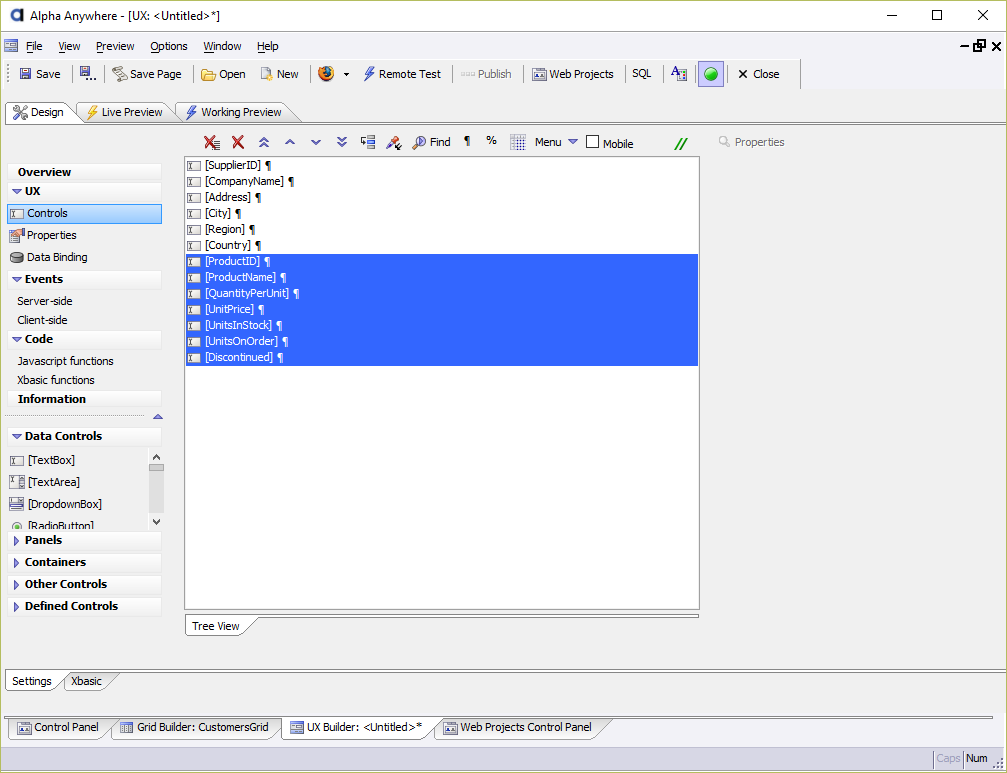
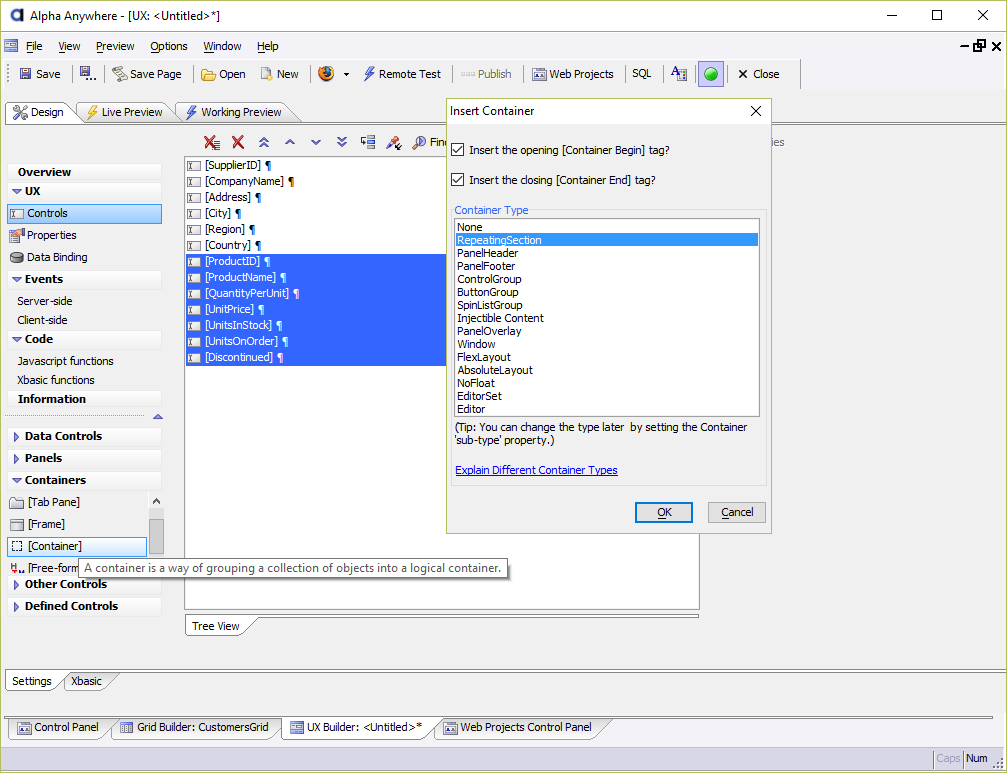
In the Containers section, click the Container option to open the Insert Container dialog. Select RepeatingSection and click OK. This will insert a repeating section around the selected controls.
Select all of the controls inside the repeating section, named REPEATINGSECTION_1, and click the
 Toggle Break button in the UX Builder toolbar to remove the break after each control. Removing the break will place all of the controls on one line, side by side.
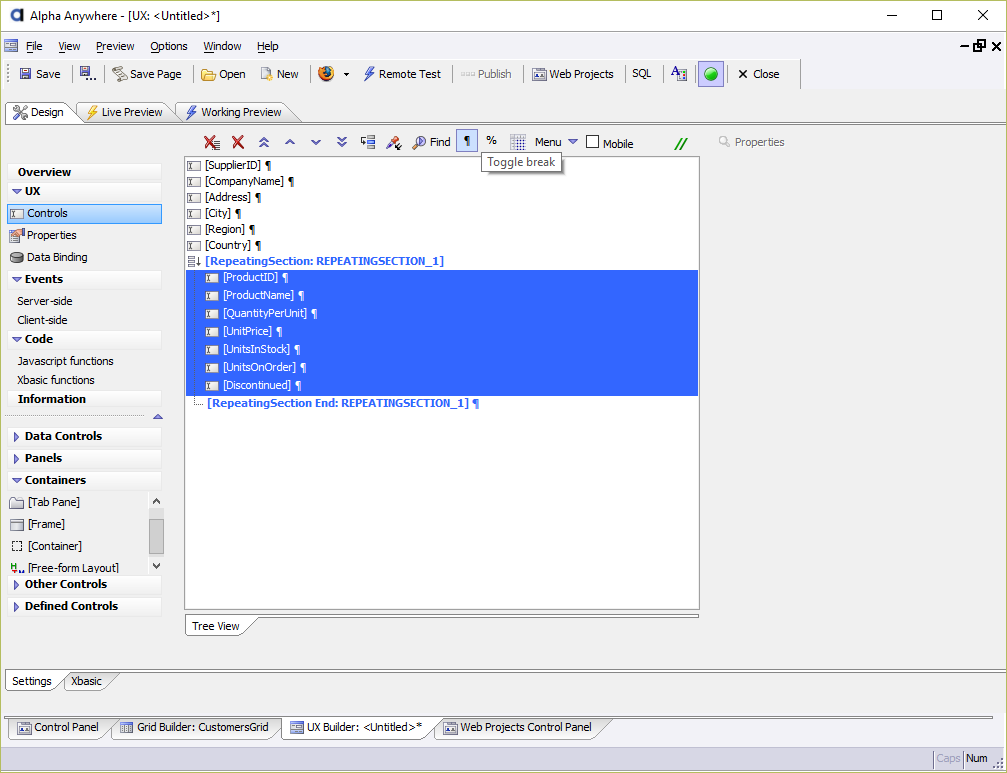
The UX Component has all the controls you need to display data from the Suppliers and Products tables. Next, you will configure the Data Binding definition for the UX Component that will link the controls in the UX to tables and fields in the Northwind database.
Lesson 2: Data Binding the UX Component to the Suppliers and Products Tables
In this lesson, you will learn:
How to Setup and Configure Data Binding to a UX Component
How to add Data Binding to a Repeating Section in a UX Component
The next step is to bind the controls in the UX Component to the tables in the Northwind database. This is done using Data Binding.
Lesson 2-1: Defining the Data Binding SQL Query
In the left-hand column, click Data Binding to open the UX Component's Data Binding pane.
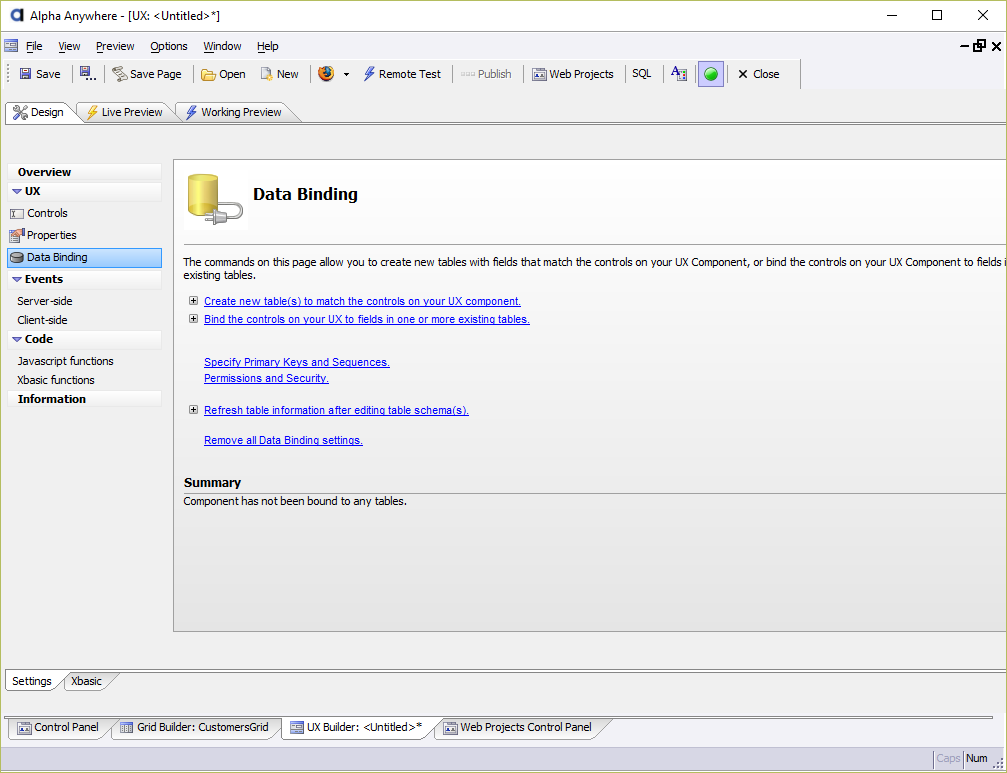
Click Bind the controls on your UX to fields in one or more existing tables to open the Bind UX Controls to Table Fields dialog.
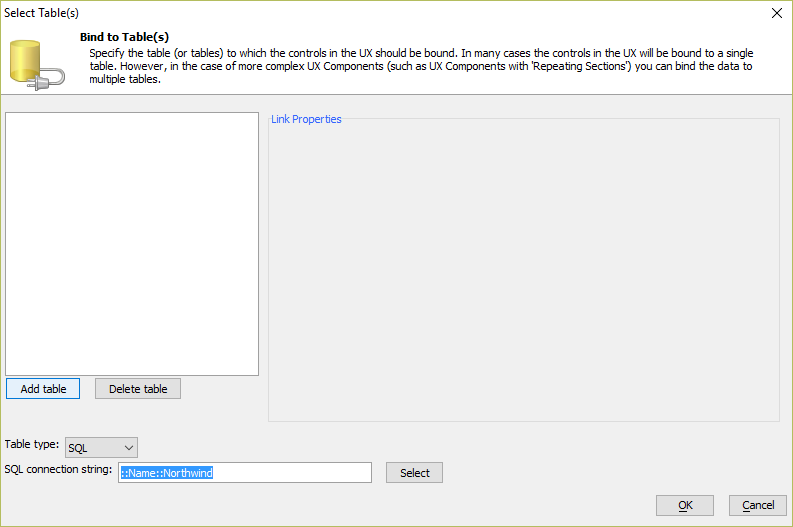
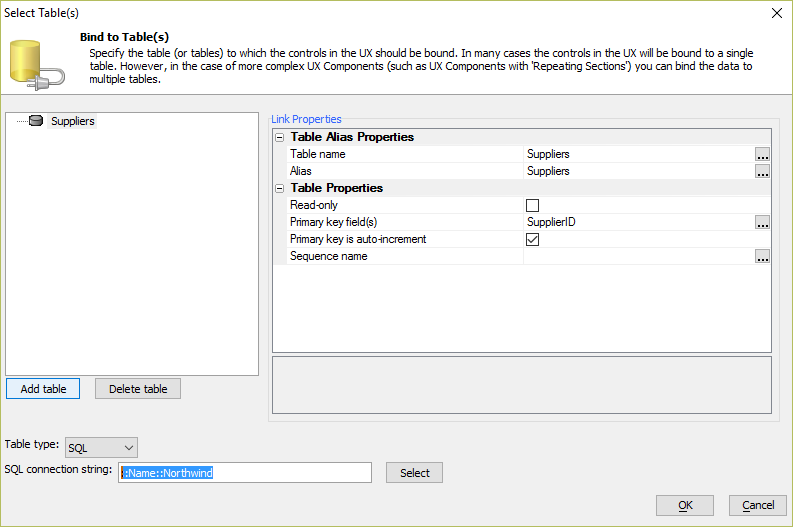
The Bind UX Controls to Table Fields dialog is where you define the mapping between tables in a database to controls in the UX Component. To data bind controls in the UX Component, you must first specify the tables in the database that will be bound to controls. Click Specify Tables to select the tables.
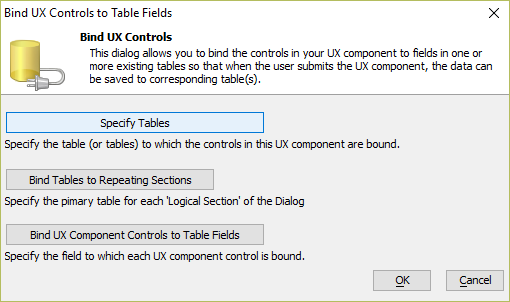
In the Select Table(s) dialog, define the SQL connection string. Make sure SQL is selected for Table type. Then, click the Select button.
In the Connection String dialog, click the Select... button. This opens the AlphaDAO Connection Strings dialog.
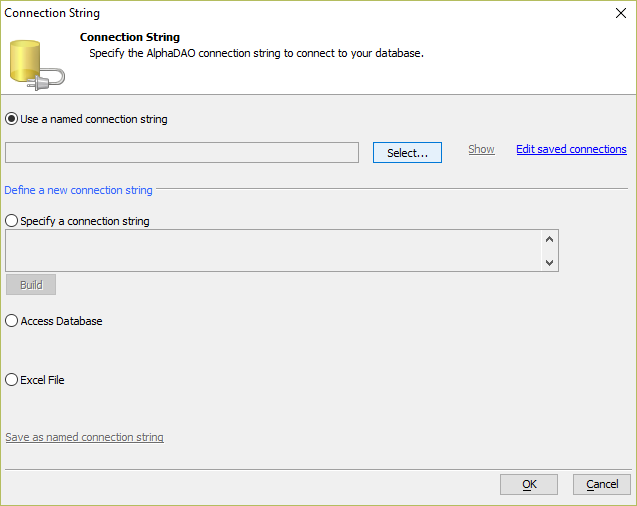
The AlphaDAO Connection Strings dialog lists all of the named connections you have created in Alpha Anywhere. Select the Northwind connection string and click OK.
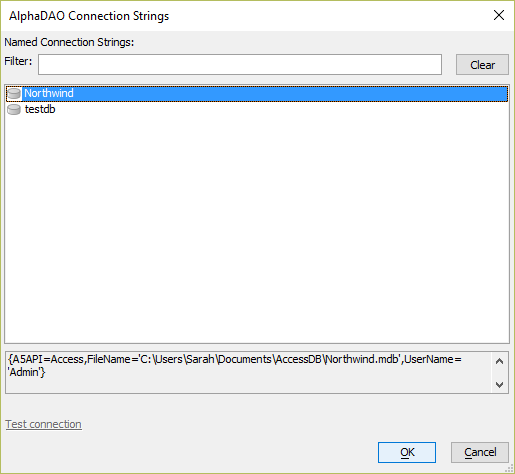 If you do not have a connection string for the Northwind database or this dialog is blank, see Creating AlphaDAO Connection Strings for instructions on how to create a connection string to the Northwind database.
Click OK in the Connection String dialog to save the selected connection string.
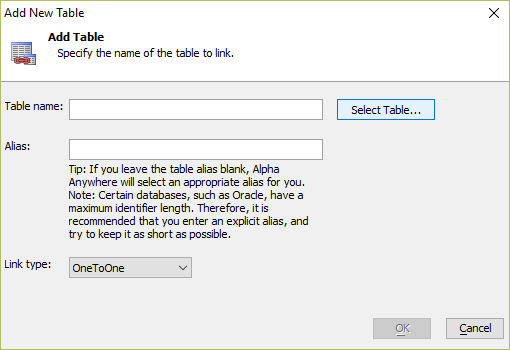
Now that the connection string is selected, you can add the tables to the data binding definition. In the Select Table(s) dialog, click Add table.
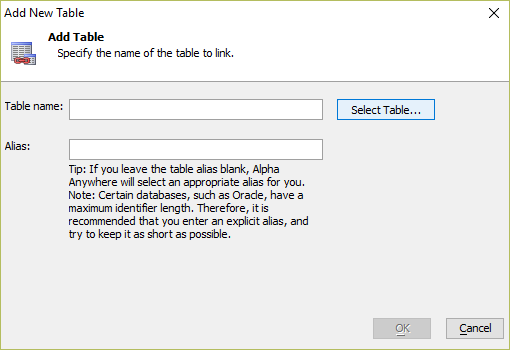
In the Add New Table dialog, click the Select Table... button.
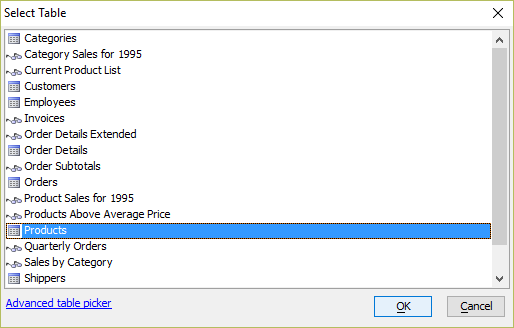
Select the Suppliers table from the list of tables in the Northwind database and click OK.
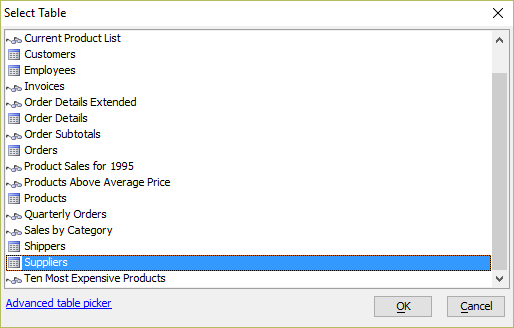 Your Select Table dialog may look different - it may only list the tables in your version of the Northwind database. The image shows both tables and views in the Northwind Access database. For databases with many tables, you can use the Advanced table picker to apply filters to find the table you want to use. Click the Advanced table picker link to display additional options.
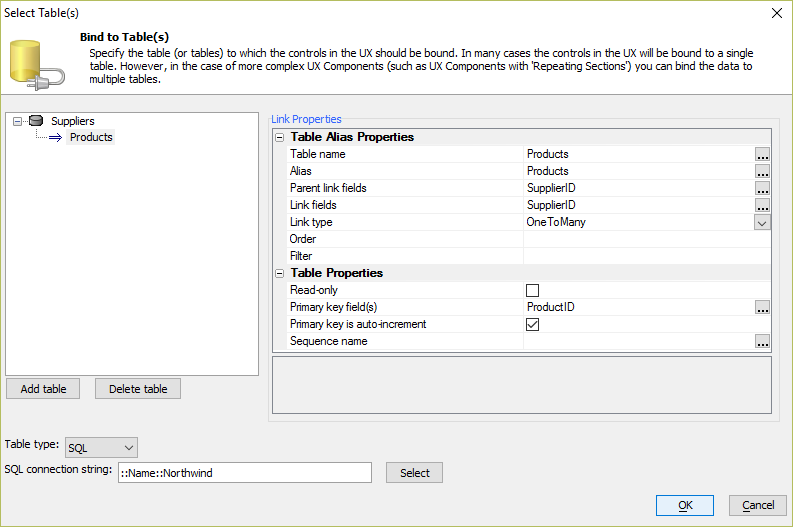
Next, you will add the Products table with a "One to Many" linking relationship with the Suppliers table. Click the Add Table button to add another table.
Click the Select Table... button.
In the Select Table dialog, select the Products table and click OK.
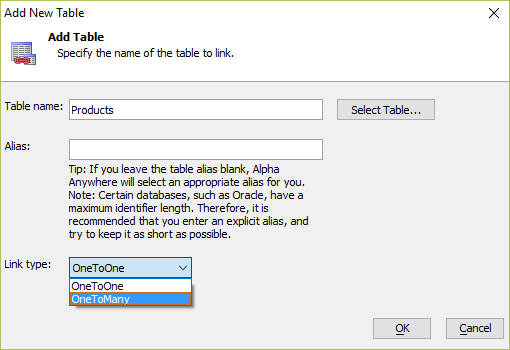
In the Add New Table dialog, change the Link type to OneToMany and click OK.
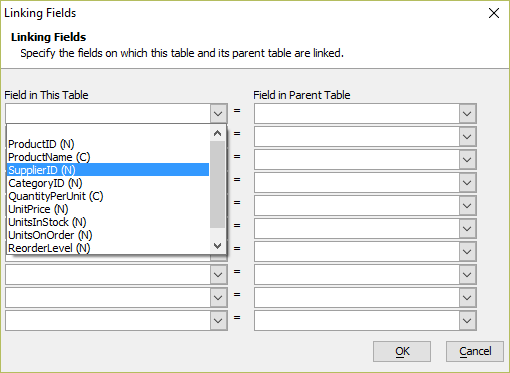
The linking fields need to be defined for the Products table. The link fields define the parent-child relationship between tables. All products in the Products table have a supplier, which can be looked up using the SupplierID. Click the
 button for the Parent link fields property to open the Linking fields dialog.
For the Fields in This Table, select SupplierID (N) from the dropdown box of choices.
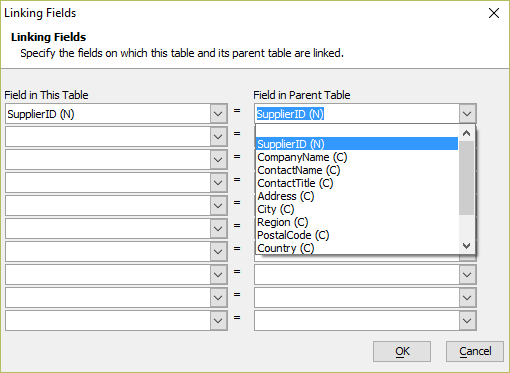
For the Field in Parent Table property, select SupplierID (N). Click OK to save the linking fields definition.
Click OK to save the SQL table definition for the UX data binding properties.
Lesson 2-2: Binding Sections to the Suppliers and Products Tables
Next, you need to bind the Products table to the Repeating Section in the UX Component.
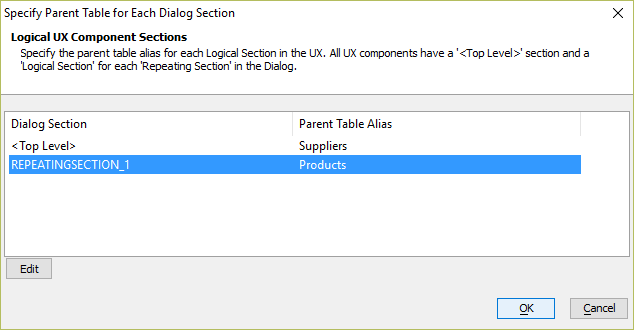
Click on Bind Tables to Repeating Sections. This will open the Specify Parent Table for Each Dialog Section dialog.

In the Specify Parent Table for Each Dialog Section dialog, you will see two items listed under Dialog Section. The first item, <Top Level> should already be set to Supplies. <Top Level> refers to every control in the UX Component that is not inside a repeating section container.
The second item, REPEATINGSECTION_1, is the repeating section in your UX Component. Every repeating section in the UX Component will be listed in this dialog. You can choose to bind the repeating section to no tables, "unbound", or to a table that has a one to many relationship with the table defined for the <Top Level> item.
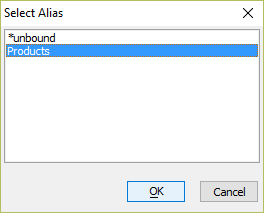
Select REPEATINGSECTION_1 and click the Edit button to bind the repeating section to a table.
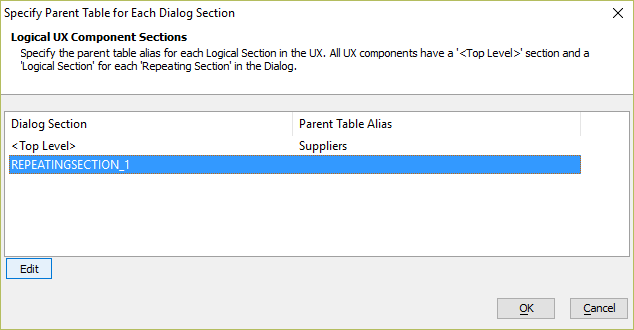
In the Select Alias dialog, select Products. Then, click the OK button. This will bind the REPEATINGSECTION_1 to the Products table.
Click OK in the Specify Parent Table for Each Dialog Section dialog to save the data binding.
Lesson 2-3: Binding Controls to Fields in the Suppliers and Products Table
Now, you need to bind each control in the UX Component to a table field. Binding controls to fields tells the UX Component what controls are used to edit and view data from the database.
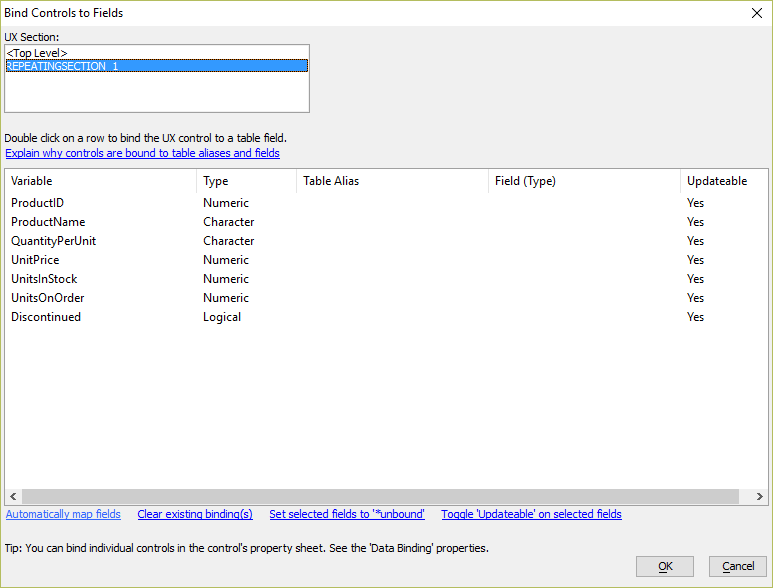
Click the Bind UX Component Controls to Table Fields button to open the Bind Controls to Fields dialog.

In the UX Section list, select <Top Level>.
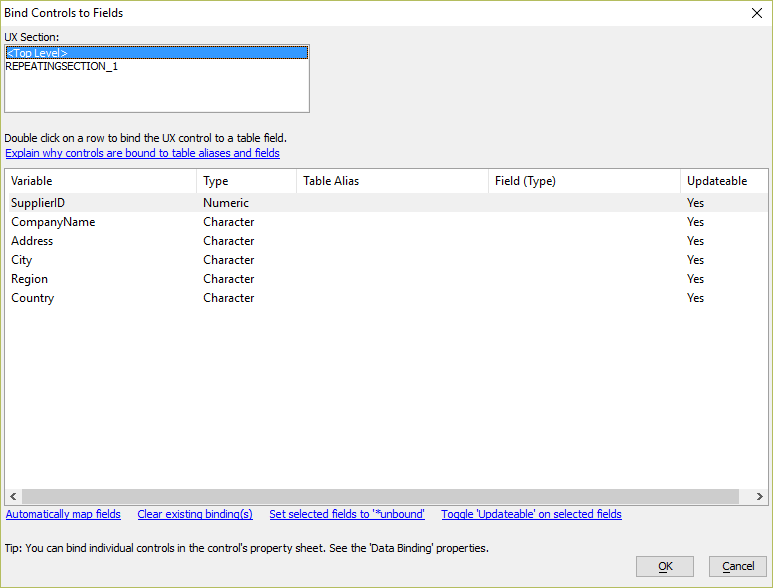
Click the Automatically map fields link in the bottom left-hand corner of the dialog. Alpha Anywhere will auto-assign fields to controls if both have the same name.
Alternatively, you can double-click on each row to open the assign fields dialog to select a specific column from the table to assign to the control.
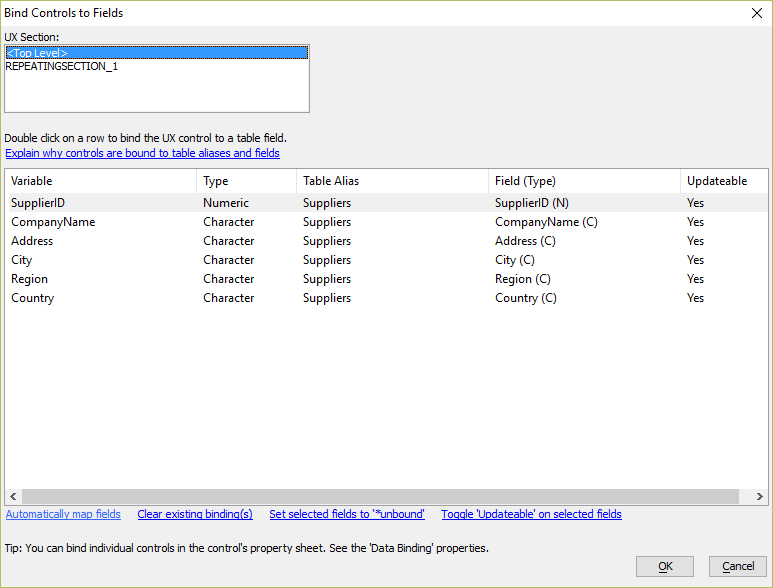
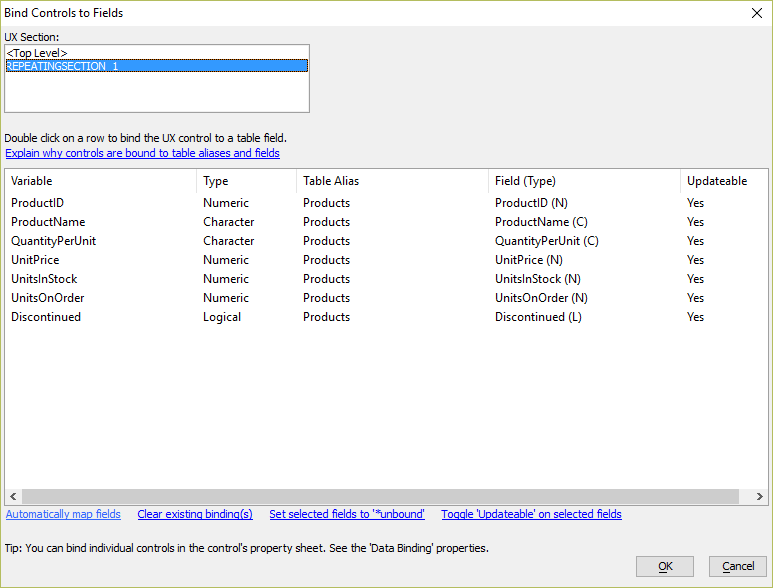
Next, select REPEATINGSECTION_1 in the UX Section list so you can bind controls in the repeating section to fields in the Products table.
Click the Automatically map fields link in the bottom left-hand corner of the dialog to auto-assign the fields. Once you are satisfied with the control data binding, click the OK button to save your changes.
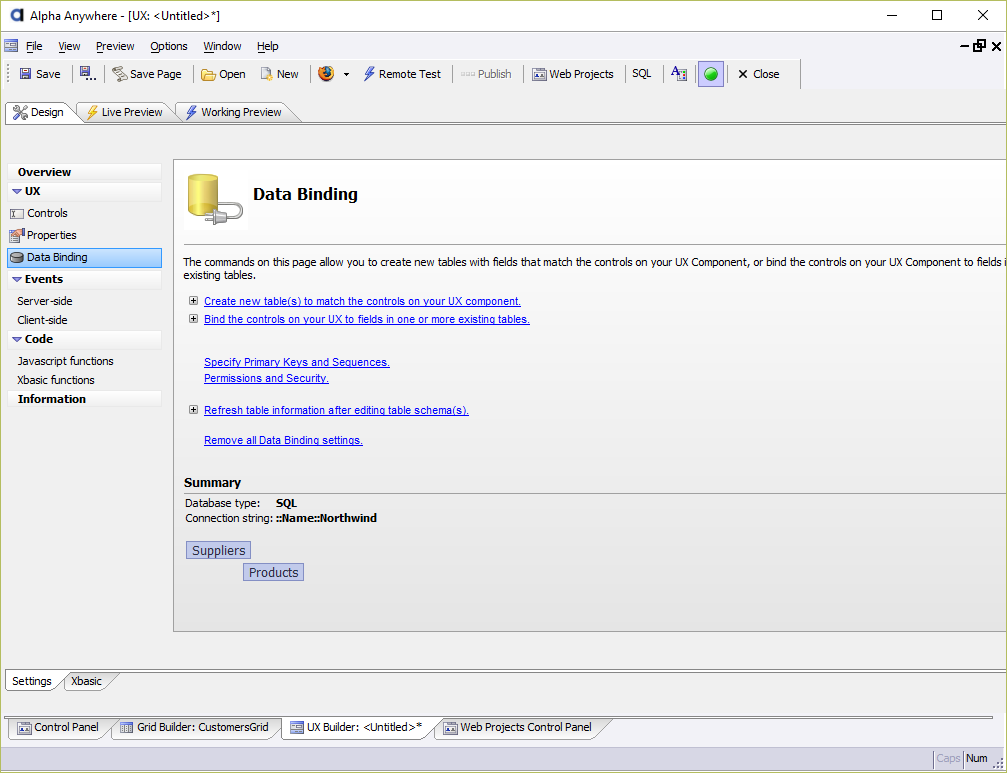
The Data Binding tab in the UX Builder now shows the data binding settings for the UX Component.
Lesson 3: Adding Record Navigation and Editing with Action Scripting
In this lesson, you will learn:
How to load Records for a Data Bound UX Component
How to add Record Navigation to a Data Bound UX Component
How to save Changes to Records in a Data Bound UX Component
Lesson 3-1: Loading the Records from the Database Into the UX Component
Next, you need to add code to load the Primary Keys from the tables defined in the Data Binding settings. This is done using server-side Action Scripting.
In the UX Builder's Events section in the left-hand column, click on Server-side to display the Server-Side Events pane. Click on onDialogInitialize to select the onDialogInitialize sever-side event.
Place the text cursor inside the onDialogInitialize function, either by clicking at the beginning of a line with a comment or clicking on a blank row. You can also add a new row at the beignning of the function.
With the insertion point inside the function, click the
 Action Scripting button to insert a new server-side action script.
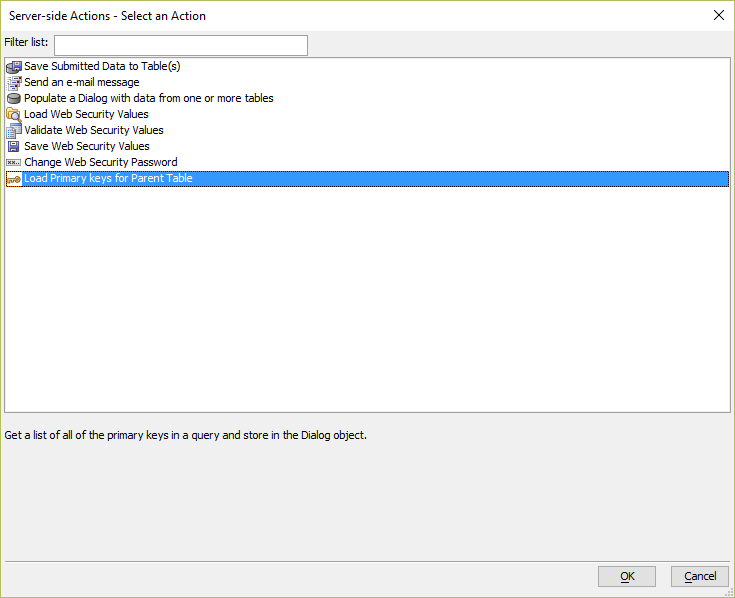
Select Load Primary keys for Parent Table and click OK.
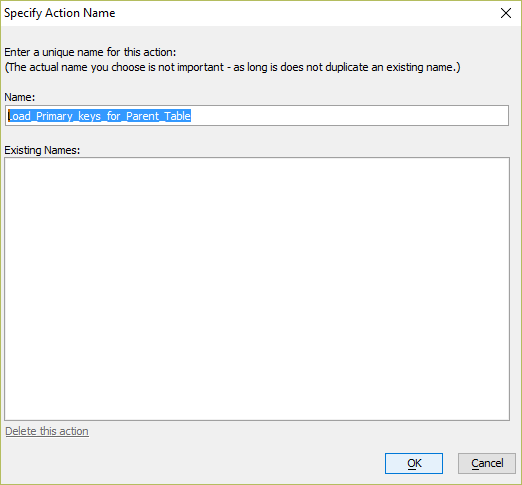
When the Specify Action Name dialog appears, click OK to accept the default action name.
Accept the default settings and click OK.
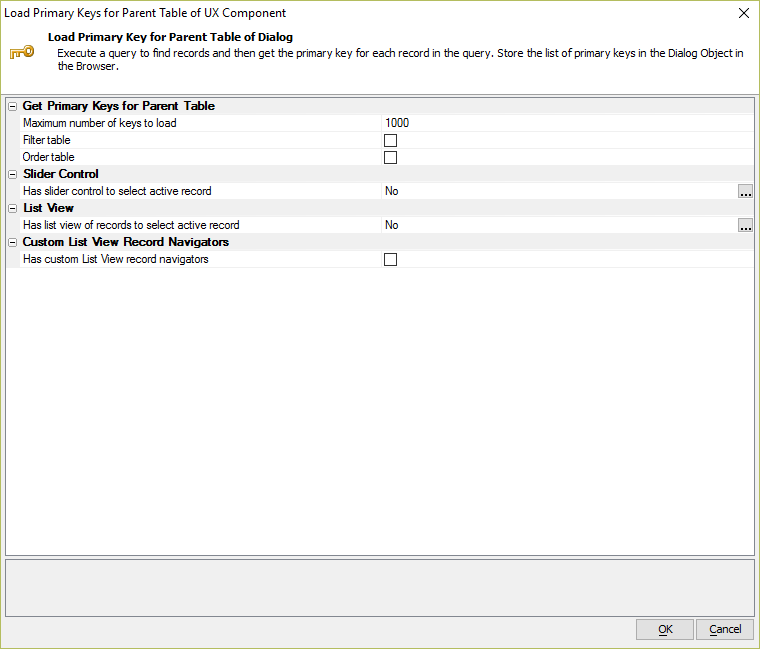
The following Action Script will be inserted into the onDialogInitialize event. Follow the instructions in the comments if you wish to modify the Action Script.
'To edit this action, place insertion point anywhere in the command, then click the 'Action Scripting' button'.
ExecuteServerSideAction("Get Primary Keys for Parent Table::Load_Primary_keys_for_Parent_Table")
Lesson 3-2: Adding Controls to Navigate Between Suppliers
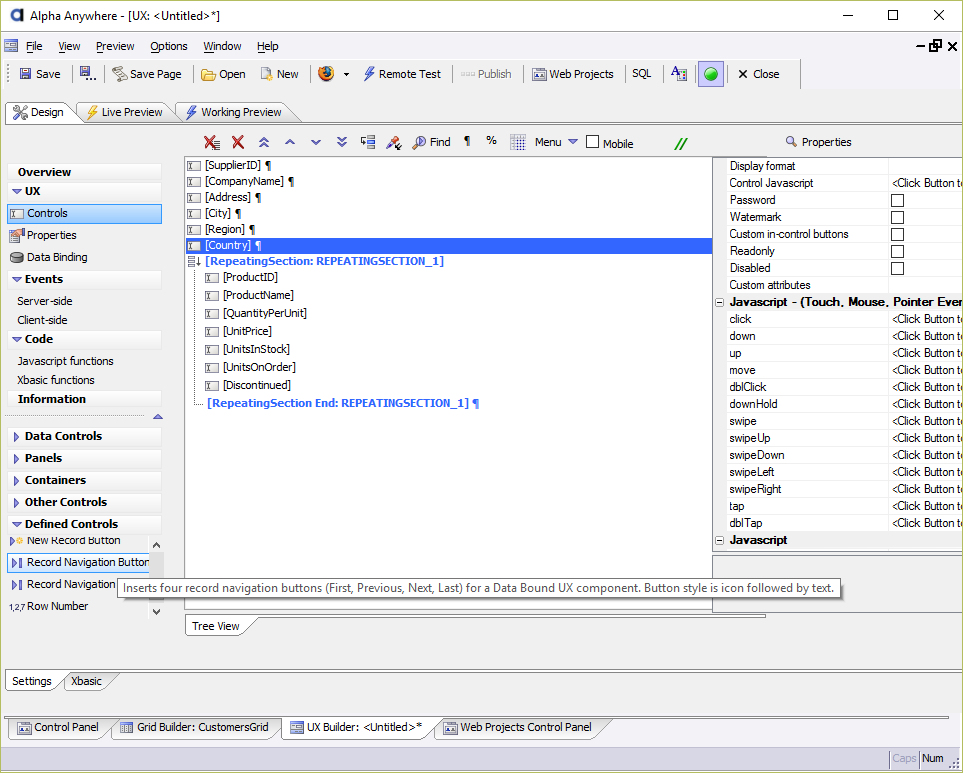
Select the Country control in the UX Component. Then, click the record Navigation Buttons option listed under Defined Controls to insert navigation buttons. Navigation buttons allow you to navigate between records in a Data Bound UX Component.
Select the Last control. Then, click the
Toggle Break button in the UX Builder toolbar. This adds a break after the Last button. Without a break, the repeating section will appear to the right of the navigation controls instead of below.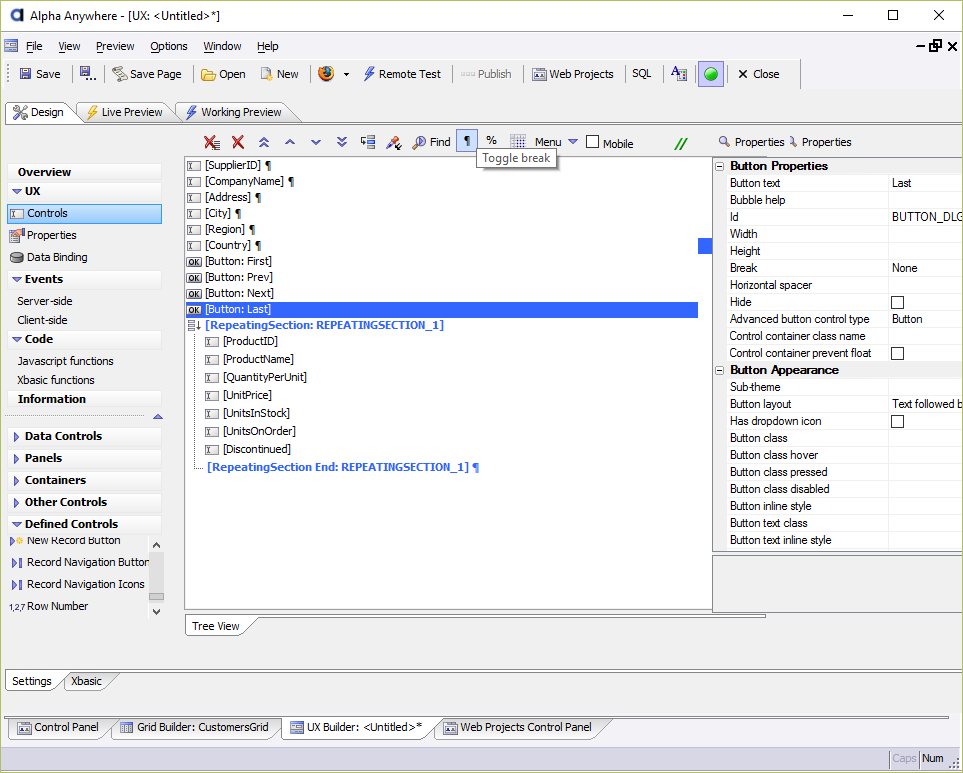
Lesson 3-3: Saving Changes to the Suppliers and Products Tables
Repeating sections can be used to build powerful interfaces for web applications. You can create multiple repeating sections to capture data in multiple tables.
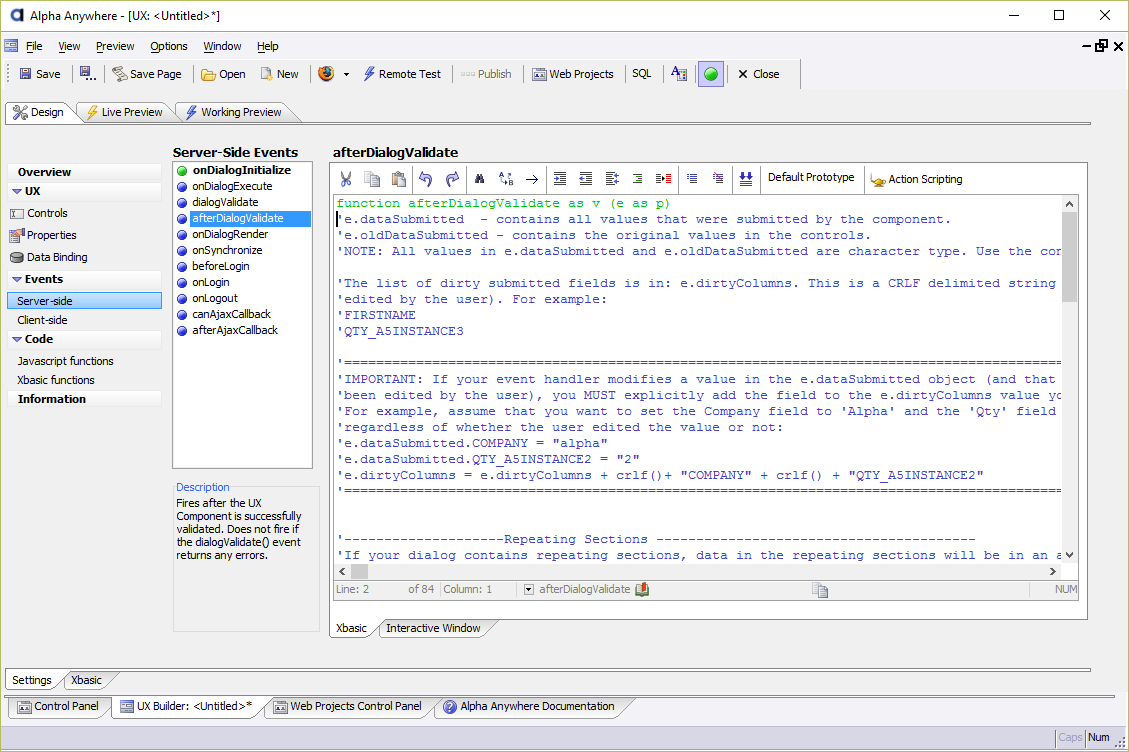
Open the Server-Side Events pane and click on the afterDialogValidate event. The afterDialogValidate event is triggered after data has been submitted to the server. If your UX Component has any field validation, this event will be exectuted after fields are sucesfully validated. If any validation rules fail, this event will not be fired.
 If you want to add validation to your UX component, check out our videos on data validation listed in Appendix A: Validating Data.
Place the mouse cursor inside the afterDialogValidate function, such as at the start of one of the comments or on a blank line, and click the Action Scripting button.
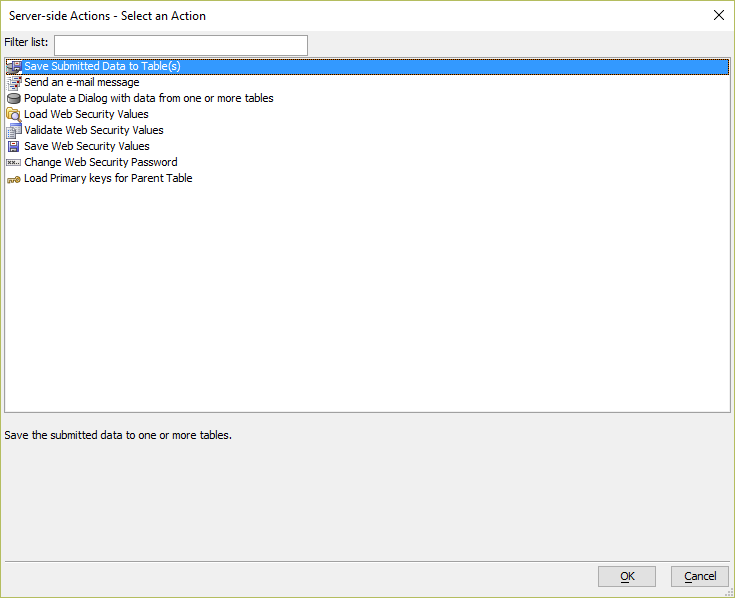
In the Server-side Actions - Select an Action dialog, select the Save Submitted Data to Table(s) action and click OK.
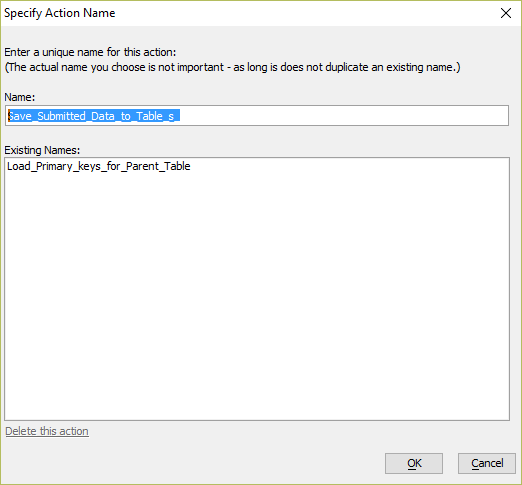
When the Specify Action Name, click OK to accept the default action name.
The Save Submitted Data to Tables dialog allows you to configure the Save Submitted Data to Table(s) action script. Here is where you define the behaviors that occur before, during, and after data is saved to the tables. Save Submitted Data to Table(s) is only available for UX Components with data bound controls. The action script uses the data binding definintion to update records in a database.

The default configuration for the Save Submitted Data to Table(s) action is to redirect to another page after the data is submitted. Change the After submit action from Redirect to another page to Edit record just submitted. The Edit record just submitted behavior will leave the current record on screen rather than redirecting the user to another page or resetting the UX component for entering a new record (i.e. Enter another record).
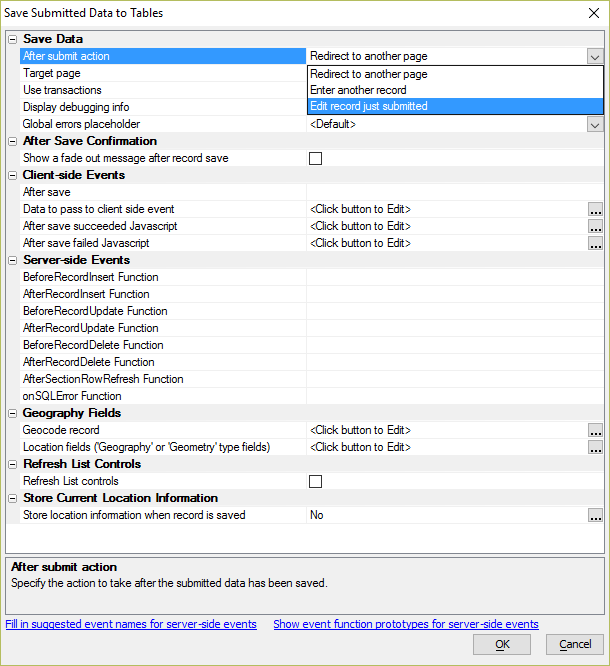
If a UX Component includes repeating sections, it's good practice to enable Use transactions. Use transactions will transaction the updates to the database. If an error occurs when updating or inserting records in either the Suppliers or Products tables, the entire transaction will be rolled back. If Use transactions is not enabled, if an error occurs when inserting records, your database can end up with partial records resulting in poor data integrity.
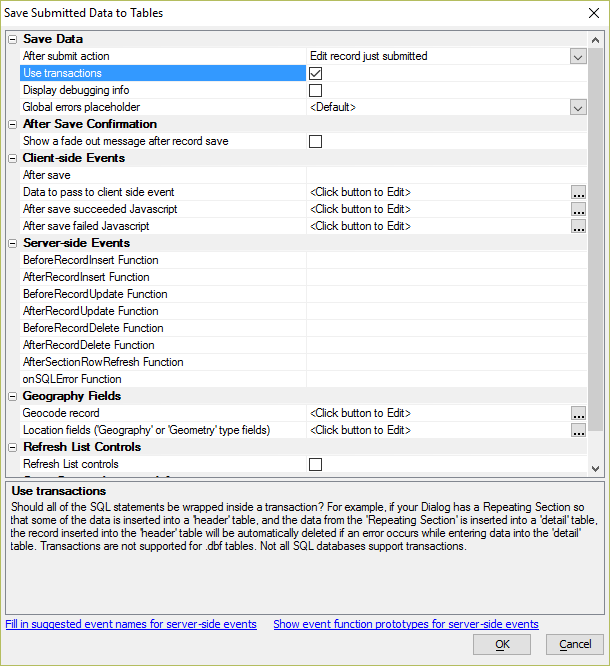 Transactions are not supported for .dbf tables. Some SQL databases do not support transactions, either. Consult your database documentation to determing if your database software supports transactions.
Click OK to finish creating the action script that will save edits to the Suppliers and Products tables. Alpha Anywhere will insert two lines of Xbasic that should looks similar to the example and image below. If you want to edit the action script that submits data to tables, follow the instructions in the comment.
'To edit this action, place insertion point anywhere in the command, then click the 'Action Scripting' button'.
ExecuteServerSideAction("Save Data::Save_Submitted_Data_to_Table_s_")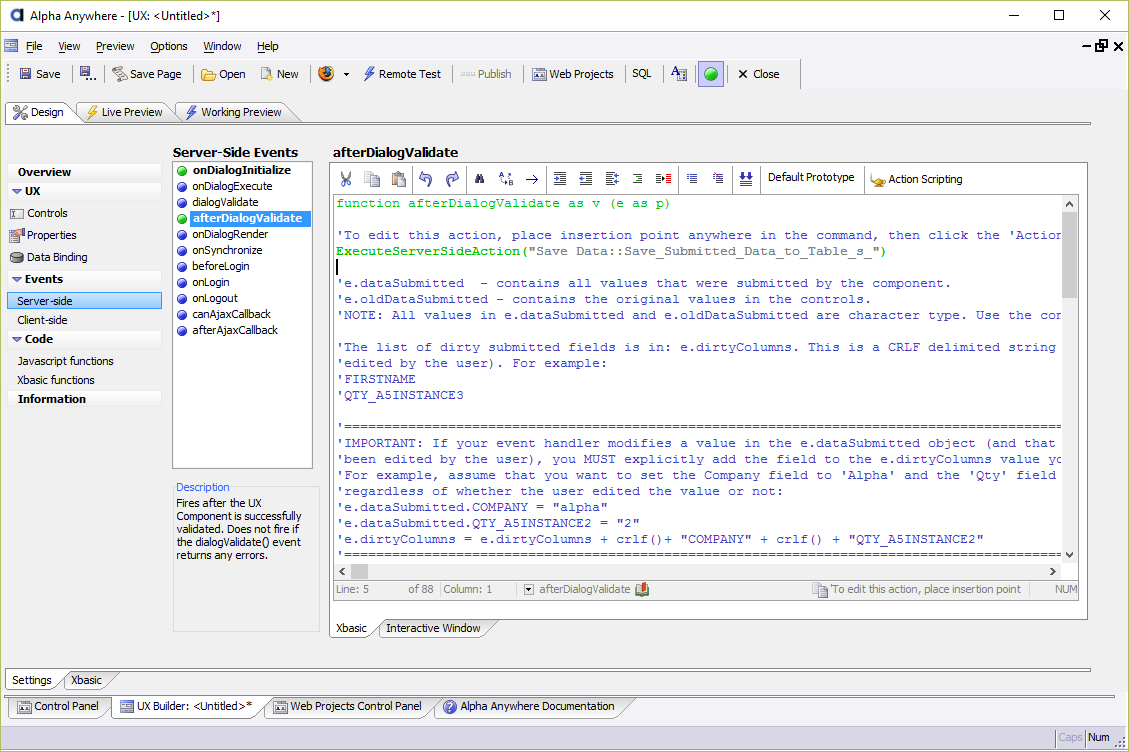
Next, you need to add buttons to submit the UX component. Submitting the UX component is the process by which data, including edits, are sent to the server. The server processes the submitted data, including checking for validation errors, and then executes several server-side events, including the afterDialogValidate event where you just added the Save Submitted Data to Table(s) server-side action script.
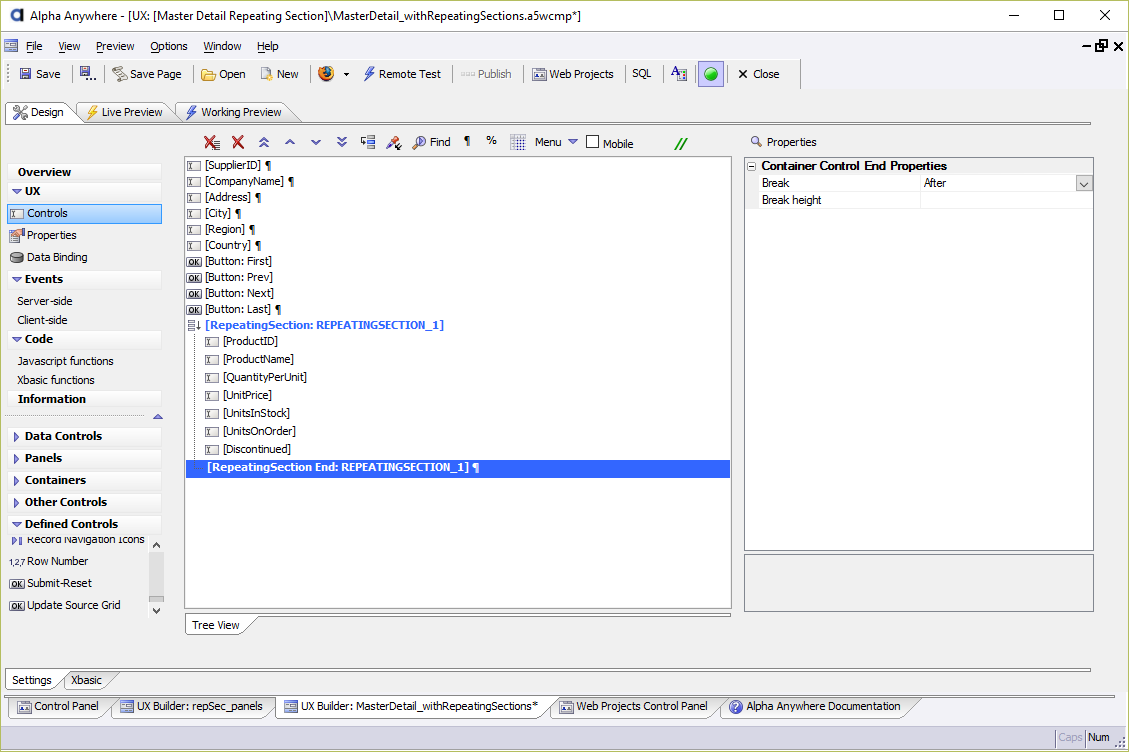
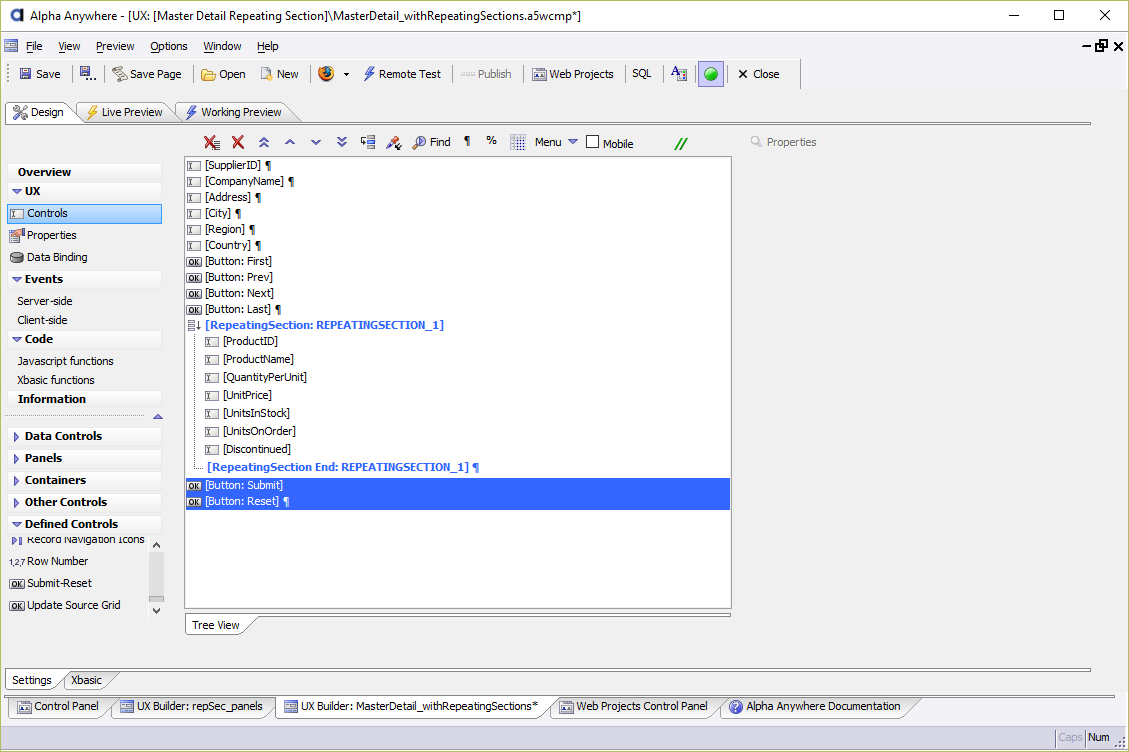
Select the RepeatingSection End control for REPEATINGSECTION_1. In the Defined Controls section, click
 Submit-Reset to insert two pre-defined buttons after the repeating section: Submit and Reset.
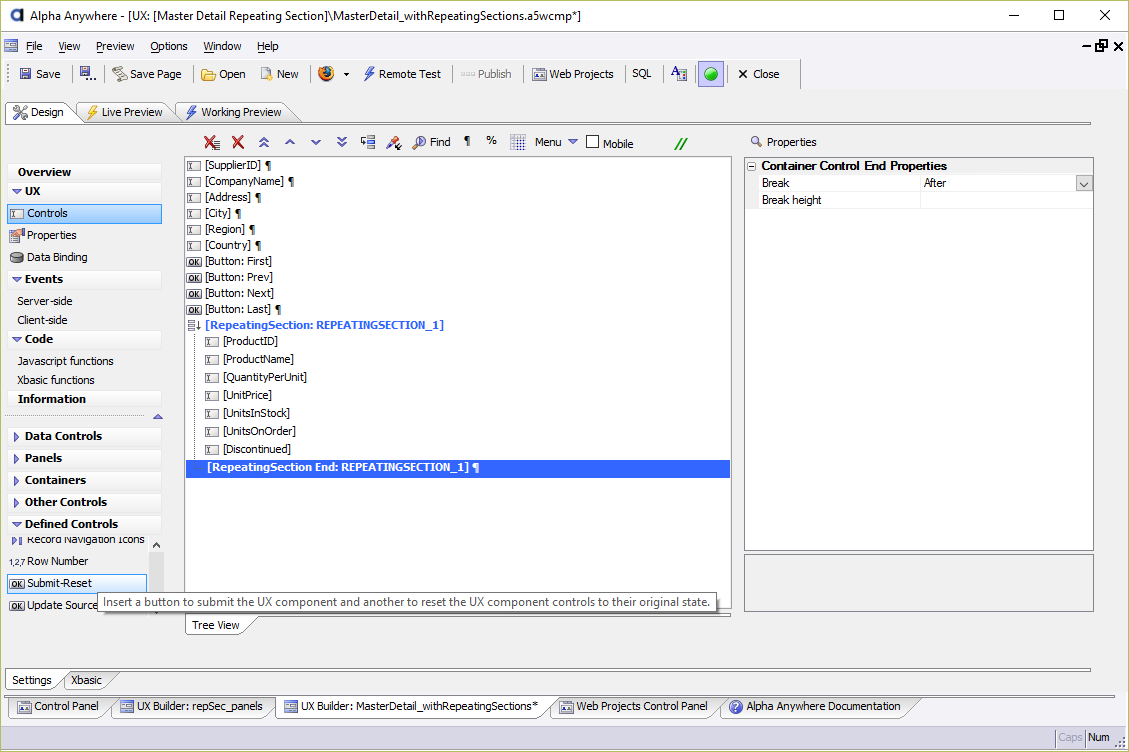
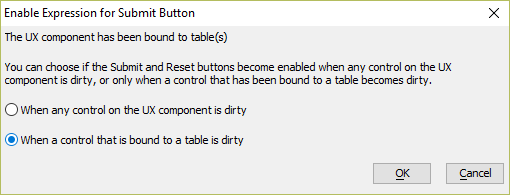
The Submit and Reset buttons will be dynamically enabled (or disabled) when edits are made to the controls in the UX Component. This behavior can occur when any control in the UX Component is edited or when controls that are bound to a table are edited.
In the app that you're building, all controls on the UX Component are bound to data controls. Therefore, the first option, When any control on the UX Component is dirty, is a reasonable choice. However, if you wanted to add a dropdownbox that lists available records the user could view/edit, the second choice, When a control that is bound to a table is dirty, is best.
When a record is selected in the dropdownbox to display, the dropdownbox control becomes "dirty". Under the When any control on the UX component is dirty behavior, choosing a different record to display would enable the Submit and Reset buttons. This behavior, however, is not desireable. You would only want the Submit and Reset buttons to be enabled if the Suppliers or Products records were edited, not when the user chooses a record to display. In this situation, you would want to use the When a control that is bound to a table is dirty behavior.
Select When a control that is bound to a table is dirty and click OK.
The Submit and Reset buttons will be inserted after the closing tag for the repeating section container. Save your UX Component.
Preview Your Application
Your Master Detail application now has all of the pieces required that allow you to view, modify, and add records to the Suppliers and Products table in the Northwind database.
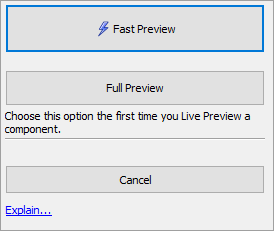
Preview the web application. Click the Live Preview tab to open the Live Preview. If prompted, start the server. When prompted, choose the Full Preview option for displaying the Live Preview. (For an explanation of Full Preview, see Previewing Components.)
 If you see an error message telling you that the port is in use, you need to change the Development Server's port number. See Configuring the Alpha Anywhere Development Server for an explanation for how this is done.
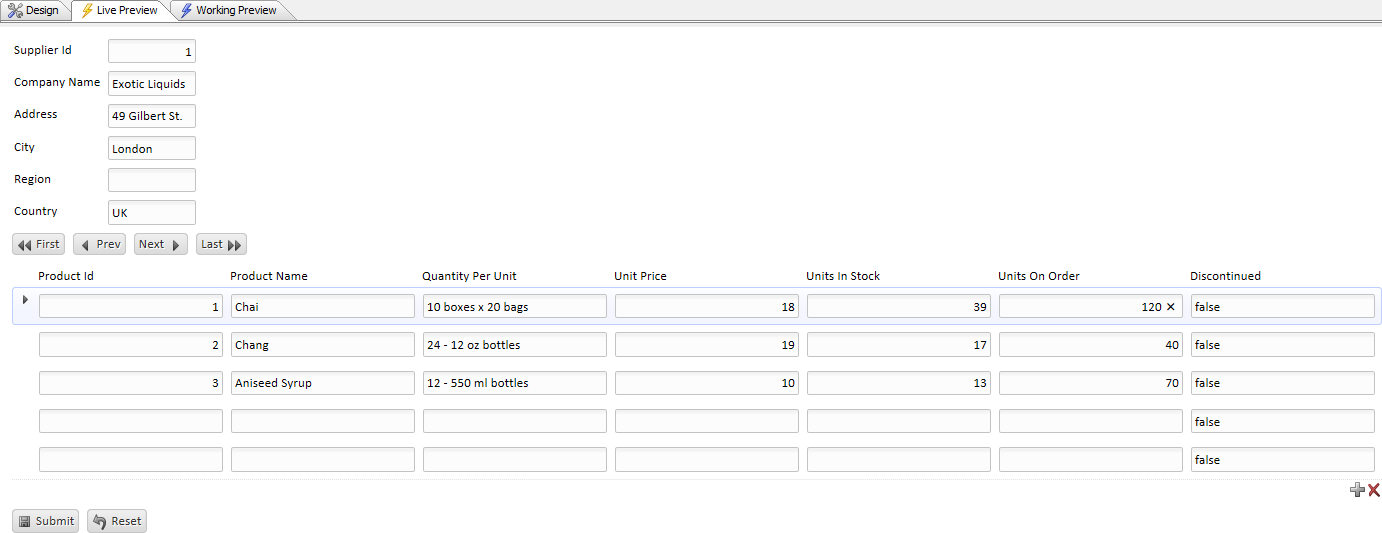
The first record in the Suppliers database will be shown with the associated Products records listed in the repeating section - which appears between the navigation buttons and Submit and Reset buttons. Clicking the First, Next, Previous, and Last navigation buttons will navigate through the records in the Suppliers table. The Products repeating section will be updated with the Products records associated with the current Suppliers record.

Editing a value in one of the text boxes will cause the Submit and Reset buttons to be enabled. After you make an edit, you can click the Submit button to save the changes to the Northwind database. Clicking the Reset button will undo all changes made to both the Suppliers and Products records.
Improving the User Interface
While your web application has the functional elements for editing records in the Suppliers and Products table, a lot can be done to improve the interface to make it more user friendly. For example, the Discontinued field is displayed as a text box with the word "true" or "false" used to indicate whether or not a product is discontinued. This text box control could be changed to a checkbox control that displays as checked if Discontinued is "true" and unchecked if Discontinued is "false".
Other changes that could be made include adjusting the widths of the text boxes - making some boxes narrower (such as those text boxes that display numeric values) while making other text boxes wider (e.g. Company Name and Address). The Width property defines the width of these controls.
Some controls, such as the Product ID, may not be appropriate to display. Controls can be selectively hidden by checking the Hide property in the control's Field Properties. The Product ID is needed for saving changes to records in the Products repeating section, but it is not necessary to display the Product ID to the user.
Formatting directives could be added to the Unit Price field to display the value as a dollar amount. This is done by creating a Client side format with a Format type of 'Number'. See Client side properties to learn more about client side formatting options available for UX controls.
Publish Your Application
The next step is to publish your application. Follow our How to Publish an Alpha Anywhere Application Guide to learn how to publish web applications to the Local Webroot using the Alpha Anywhere Development Server.
If you're planning to deploy your application using the Alpha Anywhere Application Server for IIS, you'll want to check out our IIS User's Guide. The IIS User's Guide includes information on how to setup publishing profiles and configure the IIS Server.
Appendix A: Validating Data
Validating Data in UX Components
Validation rules can be defined using a variety of methods in Alpha Anywhere. Validation Rules can be defined declaratively or using code. Rules can be evaluated client-side using Javascript or server-side using Xbasic. The videos below explain the validation options available in Alpha Anywhere and how you may use them in your own applications.
- Validating Data Part 1
- Validating Data Part 2
- Validating Data Part 3
- Validating Data Part 4
- Validating Data Part 5
- Validating Data Part 6
- Validating Data Part 6
- Validating Data - Set Focus to Control Container
- Validating Data - Animating the Topics Section
Validating Data in Repeating Sections
Validation rules can be added for repeating sections as well. Watch to learn how this is done in Alpha Anywhere.
See Also